


Understanding Finish Trim: Types and Styles
Finish trim plays a pivotal role in elevating the aesthetic appeal of any interior space. It encompasses a variety of moldings and moldings that are installed at the junctions between walls, ceilings, floors, doors, and windows. Proper selection and installation of finish trim not only enhance the visual flow of a room but also serve functional purposes such as covering gaps and imperfections. In the competitive landscape of home improvement and remodeling, understanding the nuances of finish trim—its materials, styles, and application techniques—is vital for contractors, designers, and homeowners aiming for a professional finish. For those embarking on a renovation project, exploring the best practices and materials through trusted sources or visiting local suppliers can provide invaluable insights to achieve superior results.
Common Materials Used in Finish Trim
The choice of material significantly impacts the durability, appearance, and ease of installation of finish trim. The most prevalent materials include:
- Wood: Traditional and versatile, wood (such as pine, oak, cherry, and maple) is favored for its natural beauty and ease of finishing. Solid wood trim is highly durable and easy to sand and stain, making it suitable for various styles ranging from rustic to elegant.
- Medium-density Fiberboard (MDF): MDF offers a cost-effective alternative to wood with a smooth surface ideal for painting. It resists warping and swelling better than some natural woods when properly sealed, making it a popular choice for contemporary interiors.
- PVC and Vinyl: These synthetic materials are moisture-resistant and excellent for areas prone to humidity, such as bathrooms or basements. They are lightweight, easy to install, and come in various finishes and profiles.
- Polystyrene and Polyurethane: Used mainly for decorative purposes, these materials are lightweight and can be molded into intricate profiles, ideal for decorative trims or crown moldings with elaborate designs.
Each material has its unique benefits and limitations. Selecting the right one depends on factors like budget, room moisture levels, desired aesthetic, and ease of installation. Consulting suppliers like Home Depot or local suppliers can help determine the best material for specific projects.
Popular Styles and How to Choose the Right One
Finish trim styles vary broadly, from simple and minimalistic to ornate and decorative. Common styles include:
- Baseboard: Typically the lowest trim along the floor, baseboards conceal the joint between the wall and the floor and can range from flat, simple profiles to elaborate, multi-layered moldings.
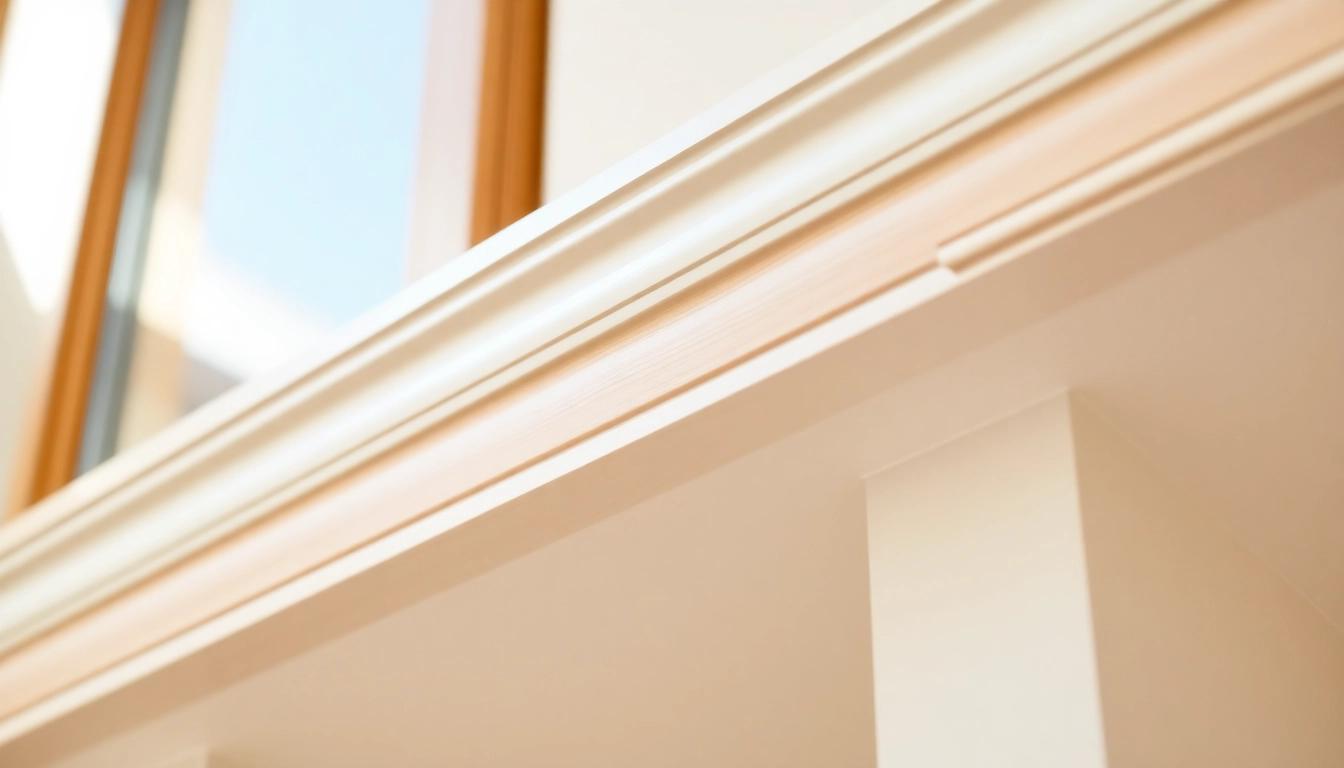
- Crown Molding: Crown moldings add a refined finish at the ceiling-line, available in various profiles including ogee, dentil, and classical designs. Choosing the right crown style depends on ceiling height and room character.
- Door and Window Casings: These trims frame openings and can be styled as simple flat moldings or raised panels, complementing overall interior designs.
- Picture Rails and Decorative Moldings: For historical or decorative interiors, decorative molding offers an opportunity to add character, such as ornate trims or mid-century modern profiles.
When choosing a style, consider the architectural style of your home, the room’s purpose, and your personal aesthetic. Modern interiors often favor clean, straight lines, while traditional spaces may incorporate detailed profiles and layered moldings. It’s advisable to visit local suppliers or browse online galleries to see real-world applications and select a style that complements your overall decor.
Design Considerations for Different Rooms
Different rooms require specific design approaches to finish trim to optimize both aesthetics and function:
- Living Rooms and Bedrooms: Focus on proportion and scale. Higher ceilings can handle larger, more elaborate moldings, while smaller rooms benefit from simpler profiles to avoid overwhelming the space.
- Bathrooms and Basements: Use moisture-resistant materials like PVC or sealed MDF. Keep trims minimal or select profiles that are easy to clean and maintain.
- Kitchens: Incorporate trims that complement cabinetry and countertops. Crown molding can add a luxurious finish, while baseboards should be durable and resistant to moisture.
- Entryways and Hallways: Consider transitional trims such as chair rails or wainscoting to add visual interest and durability against high traffic.
Accurate planning involves measuring room dimensions, ceiling heights, and understanding lighting effects. For expert guidance in matching trim styles to room functions, consulting design guides or experienced finish carpenters can lead to more cohesive results.
Preparatory Steps for Superior Finish Trim Results
Measuring and Planning Your Trim Installation
Accurate measurement is the foundation of successful finish trim application. Begin by documenting the perimeter of the room, noting door and window openings, and ceiling height. Use a tape measure to capture details meticulously, and create detailed drawings or use digital design tools to visualize connections and overlaps. This planning phase helps determine the quantity of materials needed, cutting sequences, and joint placements.
In addition, consider the room’s layout and architectural features to decide where to place specific trims and profiles. For example, the height of baseboards can vary based on wall proportions, and crown moldings should correspond with ceiling heights to maintain a balanced appearance. Proper planning reduces waste, minimizes errors during installation, and speeds up the finishing process.
Selecting the Right Tools and Materials
A successful trim installation hinges on having the appropriate tools and high-quality materials. Essential tools include miter saws, measuring tapes, level, pencil, nail guns or hammers, sandpaper, and caulking guns. For more intricate cuts and detailed joints, a miter box and coping saw are valuable.
Material selection should align with your room’s functional needs and aesthetic goals. For instance, if moisture is a concern, opt for PVC or sealed MDF. For traditional looks, solid wood options such as oak or pine are preferred. Having a variety of fasteners, including finishing nails and adhesives, ensures a secure and clean finish.
Shopping at reputable suppliers ensures access to premium materials and the latest profiles. An example of a resource for high-quality trim materials is Nick’s Building Supply.
Preparing Surfaces for a Seamless Finish
Surface preparation is crucial for achieving a polished look. Clean all surfaces thoroughly to remove dust, grease, or old paint. Sand walls and existing trim lightly to create a smooth, even surface that promotes better adhesion of paint or stain.
Fill any holes or imperfections with wood filler or spackle, then sand again for a flawless finish. If installing new trim on drywall, ensure the walls are dry, smooth, and securely anchored. For wood surfaces, sealing and priming help prevent moisture absorption and facilitate a smoother application of paint or stain.
Proper surface preparation minimizes future issues like cracking or peeling, maintaining the integrity and appearance of the trim for years to come.
Step-by-Step Guide to Installing Finish Trim
Cutting and Mitering for Precise Joints
The precision of cuts is paramount to achieve tight joints and professional-looking corners. Use a high-quality miter saw for clean, accurate angles—most interior trims require 45-degree cuts for corners. Coping joints—where one piece is cut to fit the profile of an adjoining piece—can provide even cleaner results for inside corners.
Always measure twice, cut once. When mitering, account for the wall’s angle deviations; a small adjustment can prevent gaps. Using painter’s tape along the cut lines helps prevent splintering, and test cuts before final cutting ensure accuracy.
Several resources, including online tutorials and professional guides, provide detailed techniques for miters and coping, ensuring your joints are seamless and structurally sound.
Secure Mounting Techniques and Fasteners
Proper fastening ensures stability and a neat appearance. Use a pneumatic nail gun with finishing nails or hand nails tailored to your trim’s thickness. Position nails slightly below the surface, then countersink and fill with wood filler or caulk for an unobtrusive finish.
For larger or heavier moldings, mechanical fasteners, such as screws with anchors, may be necessary. Confirm level and alignment frequently during installation, employing a level and measuring tools to maintain precision.
Adhering trims with appropriate adhesives can supplement mechanical fasteners, especially in situations where nailing alone might not provide sufficient support.
Caulking, Sanding, and Finishing Touches
Once trims are installed, the finishing process begins. Apply high-quality caulk along joints, seams, and nail holes to create a seamless appearance. Smooth the caulk with a damp finger or caulking tool for a professional look.
Sanding the edges and filled holes with fine-grit sandpaper removes uneven spots and prepares the surface for painting or staining. Be gentle to avoid damaging the trim’s profile.
Finally, clean the surface thoroughly to remove dust and apply your chosen finish—paint, stain, or clear coat—to enhance durability and aesthetics. Properly finished trim not only looks polished but also withstands the test of time and environmental factors.
Achieving a Flawless Finish: Tips and Best Practices
Painting and Staining Finish Trim for Durability
Choosing the right finish is essential for both aesthetics and longevity. For painted trim, use high-quality interior latex paint with a semi-gloss or satin sheen, which offers durability and ease of cleaning. For stained or natural wood finishes, apply a high-grade polyurethane or varnish to protect the surface while highlighting the grain.
Apply paint or stain in thin, even coats, using quality brushes or rollers designed for trim work. Multiple light coats provide a more uniform and durable finish than a single thick application. Allow sufficient drying time between coats, and lightly sand between coats for a smooth finish.
Expert tips include using painter’s tape to create clean lines and avoiding painting in high humidity or extreme temperatures, which can compromise adhesion.
Choosing the Best Sheen and Color
Color and sheen selections influence the perception and practicality of your trim. Bright whites are classic for baseboards and door casings, but colors can add character or match your decor palette. When selecting a sheen, semi-gloss and satin are preferred for trim due to their durability and ease of maintenance.
Consult color charts and test patches to ensure harmony with wall colors. For a contemporary look, consider monochromatic schemes with slightly contrasting trims. For traditional interiors, soft neutrals or classic whites are timeless choices.
Maintenance and Long-Term Care
Protecting your finish trim involves regular cleaning, such as dusting with a soft cloth or vacuuming with a brush attachment. Avoid harsh chemicals that could damage paint or stain layers. Address chips or scratches promptly by touching up with matching paint or stain, maintaining the trim’s pristine appearance.
Inspect periodically for moisture damage, warping, or pest activity, especially in areas prone to humidity. Using durable finishes and moisture-resistant materials can extend the life of your trim and keep your home looking refined for years.
Innovative Trends and Enhancements in Finish Trim
Modern Profiles and Decorative Options
The contemporary aesthetic has embraced minimalist profiles, flat trims, and geometric patterns that provide clean, sleek lines. Innovative profiles with layered and mixed materials add depth and visual interest, suitable for modern, industrial, or eclectic interiors.
Decorative trims, such as intricate crown moldings, ornate panel moldings, or geometric patterns, offer personalized touches that reflect current architectural trends. Combining these with lighting effects or contrasting finishes creates unique focal points.
Using Finish Trim to Highlight Architectural Features
Trims are powerful design tools for accentuating architectural elements like arches, niches, or built-in shelving. Applying bold or contrasting trims around features can define spaces and add depth.
For example, wide crown moldings paired with textured wall finishes or painted in contrasting colors highlight ceiling details. Wainscoting or wall panels combined with decorative trims can transform mundane walls into statement features.
Eco-Friendly and Sustainable Materials
Recycled and sustainably sourced materials are gaining popularity in finish trim production. Bamboo, reclaimed wood, or biodegradable composites offer environmentally friendly options without sacrificing quality or aesthetics.
Choosing eco-friendly finishes such as low-VOC paints, natural oils, and water-based stains further reduces environmental impact. These choices appeal to homeowners committed to sustainability and can qualify for green building certifications.